
귀퉁이 서재
컴퓨터 비전 - 6. 영상에서 감정 분류하기 본문

이번 글은 이전 게시글과 이어지는 내용입니다. 이번에는 동영상에 등장하는 여러 얼굴 이미지를 바탕으로 감정 분류를 해보겠습니다. 모델 학습까지는 이전 게시글에서 이미 설명했으니 여기서는 코드만 실겠습니다. 자세한 설명은 이전 글을 참고해주세요.
아래 코드는 구글 코랩(colab)을 바탕으로 설명합니다.
1. 구글 드라이브 마운트 & 이미지 데이터셋 불러오기
from google.colab import drive
drive.mount('/content/drive')
import zipfile
path = '/content/drive/MyDrive/colab/Computer-Vision-Course/Data/Datasets/fer_images.zip'
zip_object = zipfile.ZipFile(file=path, mode='r')
zip_object.extractall('./')
zip_object.close()2. 훈련, 테스트 데이터셋 만들기
from tensorflow.keras.preprocessing.image import ImageDataGenerator

train_generator = ImageDataGenerator(rotation_range=10,  # Degree range for random rotations
                                     zoom_range=0.2,  # Float or [lower, upper]. Range for random zoom. If a float, [lower, upper] = [1-zoom_range, 1+zoom_range]
                                     horizontal_flip=True,  # Randomly flip inputs horizontally
                                     rescale=1/255)  # Rescaling by 1/255 to normalize

train_dataset = train_generator.flow_from_directory(directory='/content/fer2013/train',
                                                    target_size=(48, 48),  # Tuple of integers (height, width), defaults to (256, 256)
                                                    class_mode='categorical',
                                                    batch_size=16,  # Size of the batches of data (default: 32)
                                                    shuffle=True,  # Whether to shuffle the data (default: True) If set to False, sorts the data in alphanumeric order
                                                    seed=10)
test_generator = ImageDataGenerator(rescale=1/255)
test_dataset = test_generator.flow_from_directory(directory='/content/fer2013/validation',
target_size=(48, 48),
class_mode='categorical',
batch_size=1,
shuffle=False,
seed=10)3. CNN 모델 설계
import numpy as np
import tensorflow as tf
from tensorflow.keras.models import Sequential
from tensorflow.keras.layers import Dense, Dropout, Conv2D, MaxPooling2D, Flatten, BatchNormalization

num_classes = 7
num_detectors = 32
width, height = 48, 48

network = Sequential()

network.add(Conv2D(filters=num_detectors, kernel_size=3, activation='relu', padding='same', input_shape=(width, height, 3)))
network.add(BatchNormalization())
network.add(Conv2D(filters=num_detectors, kernel_size=3, activation='relu', padding='same'))
network.add(BatchNormalization())
network.add(MaxPooling2D(pool_size=(2, 2)))
network.add(Dropout(0.2))

network.add(Conv2D(2*num_detectors, 3, activation='relu', padding='same'))
network.add(BatchNormalization())
network.add(Conv2D(2*num_detectors, 3, activation='relu', padding='same'))
network.add(BatchNormalization())
network.add(MaxPooling2D(pool_size=(2, 2)))
network.add(Dropout(0.2))

network.add(Conv2D(2*2*num_detectors, 3, activation='relu', padding='same'))
network.add(BatchNormalization())
network.add(Conv2D(2*2*num_detectors, 3, activation='relu', padding='same'))
network.add(BatchNormalization())
network.add(MaxPooling2D(pool_size=(2, 2)))
network.add(Dropout(0.2))

network.add(Conv2D(2*2*2*num_detectors, 3, activation='relu', padding='same'))
network.add(BatchNormalization())
network.add(Conv2D(2*2*2*num_detectors, 3, activation='relu', padding='same'))
network.add(BatchNormalization())
network.add(MaxPooling2D(pool_size=(2, 2)))
network.add(Dropout(0.2))

network.add(Flatten())

network.add(Dense(2*2*num_detectors, activation='relu'))
network.add(BatchNormalization())
network.add(Dropout(0.2))

network.add(Dense(2*num_detectors, activation='relu'))
network.add(BatchNormalization())
network.add(Dropout(0.2))

network.add(Dense(num_classes, activation='softmax'))
4. 모델 훈련
network.compile(optimizer='Adam', loss='categorical_crossentropy', metrics=['accuracy'])

epochs = 70
network.fit(train_dataset, epochs=epochs)
5. 영상에서 감정 분류
FER2013 이미지로 훈련을 마친 network 모델을 활용해 실제 영상에서 감정 분류를 해보겠습니다.
import cv2

# Create VideoCapture object
cap = cv2.VideoCapture('/content/drive/MyDrive/colab/Computer-Vision-Course/Data/Videos/emotion_classification.mp4')

video_width = cap.get(cv2.CAP_PROP_FRAME_WIDTH)  # Video capture's frame width
video_height = cap.get(cv2.CAP_PROP_FRAME_HEIGHT)  # Video capture's frame height
video_size = (round(video_width), round(video_height)) # Video size
video_fps = cap.get(cv2.CAP_PROP_FPS)  # FPS(Frames Per Second)
frame_cnt = int(cap.get(cv2.CAP_PROP_FRAME_COUNT))  # Number of frames

print('Number of frames:', frame_cnt, '/ FPS:', round(video_fps), '/ Frame size:', video_size)
Number of frames: 408 / FPS: 24 / Frame size: (640, 360)
총 프레임 갯수는 408개, FPS는 24, 프레임 크기는 (640, 360)이군요. 코드를 살펴볼까요? cv2.VideoCapture() 메서드는 영상을 개별 프레임(Frame)으로 하나씩 읽게끔 하는 비디오 캡쳐 객체를 만듭니다. 비디오 캡쳐 객체는 영상 스트리밍을 프레임별로 캡쳐해 처리하는 기능을 제공합니다. 이 비디오 캡쳐 객체에 get() 메서드를 호출하면 영상 파일이 갖는 다양한 속성을 가져올 수 있습니다. cv2.CAP_PROP_FRAME_WIDTH는 영상 프레임의 너비, cv2.CAP_PROP_FRAME_HEIGHT는 영상 프레임의 높이를 뜻합니다. cv2.CAP_PROP_FPS는 영상의 FPS를 뜻합니다. FPS란 Frames Per Second의 약자로 일초에 처리하는 프레임 수를 말합니다. 일초에 처리하는 프레임이 많을수록 영상을 끊김없이 부드럽게 재생합니다. 곧, FPS가 높을수록 고품질 영상이죠. 아래 그림을 보시면 이해가 쉽습니다.

다음으로 감정 분류한 영상을 저장하기 위한 VideoWriter 객체를 만들어 보겠습니다.
# In Linux, the extension of video output must be set to avi
video_output_path = '/content/drive/MyDrive/colab/Computer-Vision-Course/Data/Videos/emotion_classification_result.avi'

codec = cv2.VideoWriter_fourcc(*'XVID')  # Set the codec

video_writer = cv2.VideoWriter(video_output_path, codec, video_fps, video_size)
첫 번째로 처리한 영상을 저장할 경로를 지정합니다. VideoWriter 객체로 영상을 처리하고 저장하려면 avi 확장자로 저장해야 하는 점을 주의해주세요. 두 번째 코드는 코덱을 설정하는 코드입니다. 세 번째 코드에서 VideoWriter 객체를 만드는데, 이때 인코딩 코덱 유형을 전달해야 하기 때문입니다. 영상을 저장할 때 특정 유형으로 동영상을 인코딩할 수 있습니다. 인코딩 유형으로는 DIVX, XVID, MJPG, X264, WMV1, WMV2 등이 있습니다. 마지막 코드로 VideoWriter 객체를 생성합니다. VideoWriter 객체는 VideoCapture로 읽어들인 프레임을 동영상으로 저장하는 기능을 제공합니다. VideoWriter 객체는 저장할 동영상 파일 위치, 인코딩 코덱 유형, FPS 수치, 프레임 크기를 인자로 받아 이 값에 따라 동영상을 저장합니다.
이어서 CNN 모델로 얼굴을 검출한 뒤, 검출된 얼굴을 바탕으로 감정을 분류해서 동영상으로 저장해보겠습니다. 1) 영상에서 얼굴을 검출하고, 2) 검출된 영역을 ROI로 추출하고, 3) 추출된 ROI에서 감정을 분류한 뒤, 4) 영상에 감정 결과값을 입력하는 절차입니다.
import dlib

cnn_face_detector = dlib.cnn_face_detection_model_v1('/content/drive/MyDrive/colab/Computer-Vision-Course/Data/Weights/mmod_human_face_detector.dat')

green_color=(0, 255, 0)
red_color=(0, 0, 255)
emotions = ['Angry', 'Disgust', 'Fear', 'Happy', 'Neutral', 'Sad', 'Surprise']

while (cv2.waitKey(1) < 0):
    connected, frame = cap.read()  # Read one frame from a VideoCapture object
    if not connected:
        break
    face_detections = cnn_face_detector(frame, 1)
    if len(face_detections) > 0:
        for face_detection in face_detections:
            left, top, right, bottom, confidence = face_detection.rect.left(), face_detection.rect.top(), face_detection.rect.right(), face_detection.rect.bottom(), face_detection.confidence
            cv2.rectangle(frame, (left, top), (right, bottom), green_color, 2)
            roi = frame[top:bottom, left:right]
            roi = cv2.resize(roi, (48, 48))  # Extract region of interest from image
            roi = roi / 255  # Normalize
            roi = np.expand_dims(roi, axis=0)
            preds = network.predict(roi)

            if preds is not None:
                pred_emotion_index = np.argmax(preds)
                cv2.putText(frame, emotions[pred_emotion_index], (left, top-10), cv2.FONT_HERSHEY_SIMPLEX, 0.5, red_color, 1)

    video_writer.write(frame)

video_writer.release()
cap.release()
While 문이 나오죠? 모든 프레임을 불러와서 처리를 끝내면 이 While문이 끝납니다. 앞서 불러온 영상을 활용해 비디오 캡쳐 객체를 만들었죠. 이 객체를 cap 변수에 저장했습니다. 그리고 이 영상의 프레임 수는 408개였습니다. 다시 말해 프레임 408개를 모두 불러오고 일정한 처리를 마친 뒤, 더 이상 불러올 프레임이 없으면 While문은 끝나게 코드를 짰습니다.
While문이 어떻게 구성됐는지 보죠. cap.read()는 비디오 캡쳐 객체 cap에서 프레임을 하나 읽습니다. cap.read()는 반환값이 두 개입니다. 첫 번째 반환값(connected)은 프레임이 있는지 여부(True, False)를 뜻하고, 두 번째 반환값(frame)은 불러온 프레임을 뜻합니다. 만약 불러올 프레임이 없다면, 곧 connected가 False라면 While문을 끝냅니다. 반대로 불러올 프레임이 있다면 현재 프레임서 얼굴을 검출한 뒤, 검출한 얼굴 영역에 cv2.rectangle() 메서드로 사각형을 그립니다. 이어서 검출 영역의 크기를 (48, 48)로 조정한 뒤 정규화까지 합니다. 차원을 하나 추가하고(배치 크기를 1로 하는 작업), 이미 훈련한 network를 활용해 감정 분류를 합니다. 감정 분류 결과값도 얼굴 위에 표시합니다. cv2.putText() 메서드를 활용해서 말이죠.
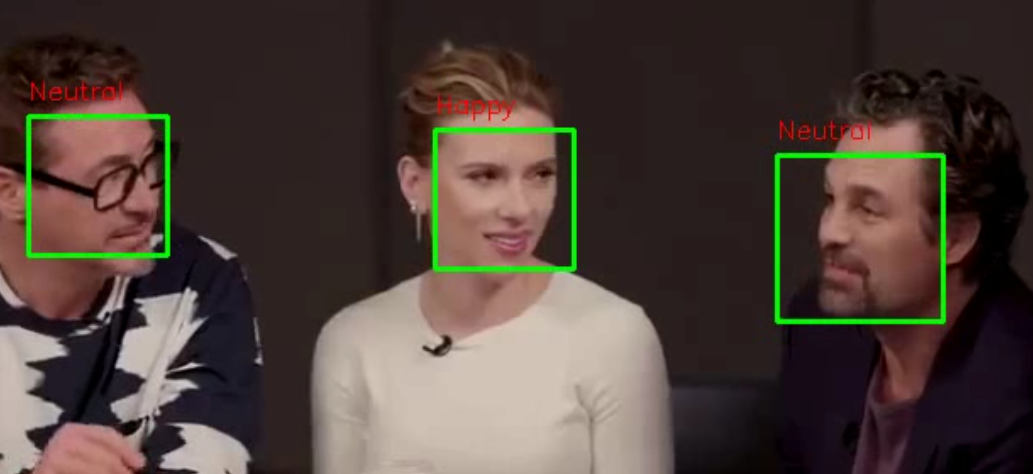
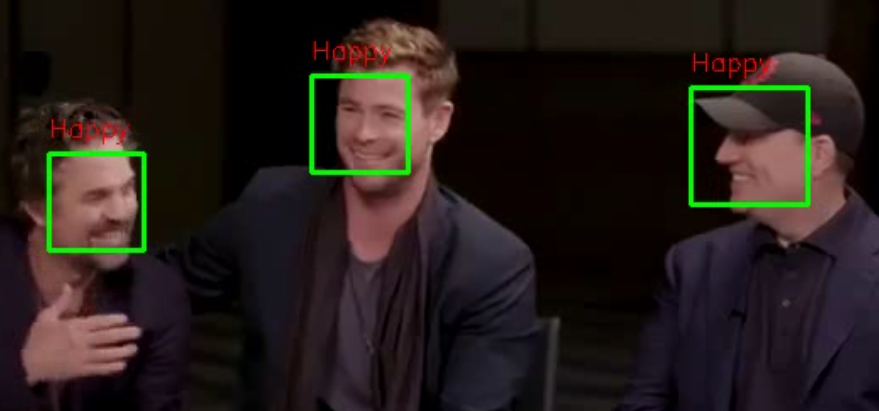
마지막으로 VideoWriter 객체에 write() 메서드를 호출하면 현재 프레임 이미지를 영상 파일에 저장합니다. 이때 저장할 이미지 프레임과 영상의 프레임 크기가 같아야 합니다. 모든 영상 처리가 끝난 뒤에는 release()를 호출해 VideoWriter 객체와 VideoCapture 객체를 닫습니다. 간단한 영상 처리를 마쳤습니다. 영상 처리를 마친 파일을 emotion_classification_result.avi로 저장했으니, 다운로드해 실행해봅시다. 다음과 같이 얼굴마다 감정을 표시했습니다. 영상에서 두 장면을 캡쳐한 화면입니다(체리피킹한 것입니다. 얼굴 표정을 제대로 구분 못한 때도 많습니다).
참고 자료
'컴퓨터 비전' 카테고리의 다른 글
| 컴퓨터 비전 - 8. 오토인코더 실습 (1) | 2023.03.13 |
|---|---|
| 컴퓨터 비전 - 7. 오토인코더(AutoEncoder)와 매니폴드 학습(Manifold Learning) (4) | 2023.03.12 |
| 컴퓨터 비전 - 5. 얼굴 이미지에서 감정 분류(Emotion Classification) (0) | 2023.03.09 |
| 컴퓨터 비전 - 4. LBPH 알고리즘을 활용한 얼굴 인식 (0) | 2023.03.09 |
| 컴퓨터 비전 - 3. LBPH(Local Binary Patterns Histograms) 알고리즘 (0) | 2023.03.07 |


